
The Bonavita Immersion Dripper is one of the most user-friendly coffee makers in the market. We’re going to take a look at how to brew coffee with this coffee maker.
The process of using the Bonavita Immersion Dripper is the same as making French press coffee. You just steep the coffee grounds for roughly five minutes, and then you’ll use the lever to allow the coffee to drain down into the mug below the brewer. For a more detailed guide, let’s discuss all the steps below:
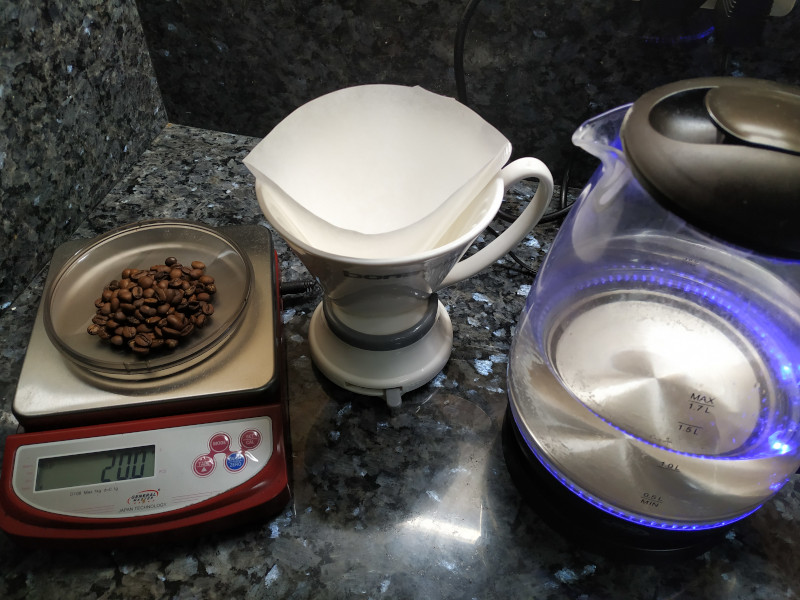
Items Needed Before Brewing
Unlike pour over methods, making coffee with the Bonavita Immersion Dripper is simple. You don’t need a lot of equipment, just the items below:
- Freshly boiled water
- Bonavita Immersion Dripper
- Filter #4
- Cup/mug/carafe
- Optional: Weighing Scale (Highly recommended)
- Optional: Thermometer
- Timer (Watch or phone will do)
Steps included in Brewing with the Bonavita Immersion Dripper
For those who are familiar with the French press and would want a quick guide on using the Bonavita Immersion Dripper, I’ve listed the steps required to brew below:
- Step 1: Start Boiling Water, Weigh the Beans, Close the Dripper Valve, Place Filter Inside the Dripper, and Set Your Timer
- Step 2: After Water has Boiled, Preheat the Dripper
- Step 3: Grind Your Coffee Beans while Waiting for Dripper to Heat Up
- Step 4: Discard Water in Dripper
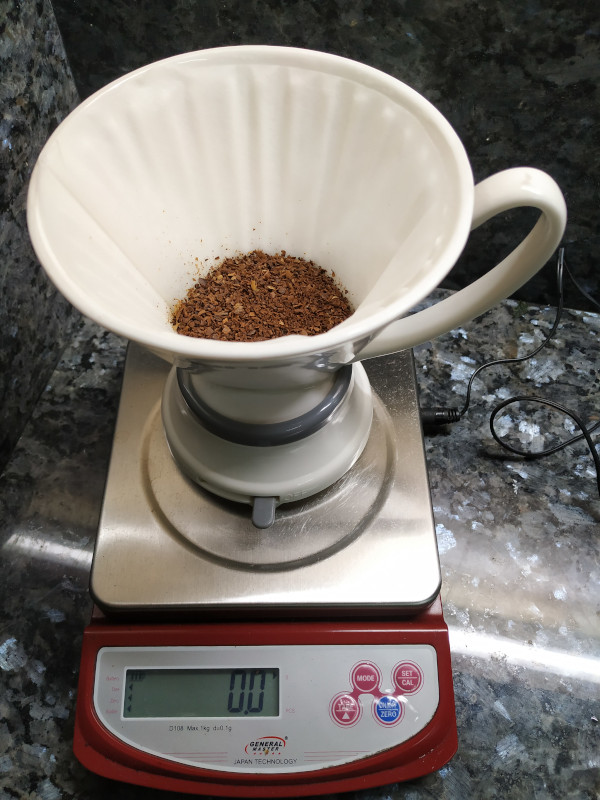
- Step 5: Place Ground Coffee in Dripper
- Step 6: Start Your Timer and Place 10% of Boiled Water into Dripper (30 Seconds)
- Step 7: After 30 Seconds, Add the Remaining Water into the Dripper
- Step 8: Stir, Cover, and Wait
- Step 9: Place on Vessel and Release the Coffee!
- Step 10: Enjoy!
If you need more explanation on each of the steps, continue reading below as I’ll expound on each of the steps mentioned above.
Step 1: Start Boiling Water, Weigh the Beans, Close the Dripper Valve, Place Filter Inside the Dripper, and Set Your Timer
As you can see, you can multitask many steps in a single process. In step number 1, you can weight the beans and place the filter inside the dripper while the water’s boiling. It’ll take about five minutes for the water to boil, so you’ll have plenty of time in doing the other requirements.
Weighing Beans
How much beans do you need? A simple ratio I always use is to use 1 gram of coffee beans to 15 ml of water. Don’t worry about the gram to ml conversion in the weighing scale if you’re using one, as 1 ml of water is also equal to 1 gram of water.
For starters, I’ve made a table below to help you see how much beans you need when brewing different volumes of coffee
|
Description |
Grams of Coffee |
Capacity (in ml) |
Capacity (in oz) |
|
Small cup |
10 grams |
150 ml |
5 oz |
|
Regular cup |
12 grams |
180 ml |
6 oz |
|
Mug |
20 grams |
300 ml |
10 oz |
|
2 small cups |
20 grams |
300 ml |
10 oz |
|
2 regular cups |
24 grams |
360 ml |
12 oz |
The table above is good when you’re brewing medium roasted coffee. If you go for dark roasts, you’d want to lessen the grams of coffee beans that you’ll use. A good starting point will be to lessen 2 grams of coffee per 150 ml or 5 oz of water, and then adjust on the next brew.
Closing the Dripper Valve
This is a feature that is unique to the Bonavita Immersion Dripper. Theres a valve right below the brewing section that you can open and close. Make sure that the valve is closed at this point to that you don’t spill any water or coffee for the sections ahead.
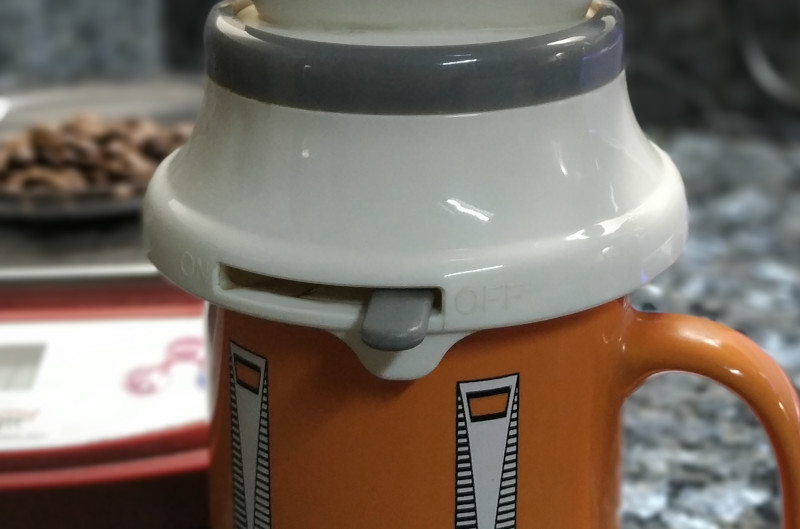
I write this down because I’ve forgotten to close it before and the water to preheat the brewer came straight out. It would be very dangerous to leave it open as you could burn yourself, or someone else next to you, with the hot water.
Placing the Filter Inside the Dripper
The Bonavita Immersion Dripper uses a #4 filter. Make sure you have the correct filter number. It’s important that the filter fits snugly into the dripper, resting on the ridges of the dripper. If you bought a number 4 filter but it’s still smaller than the dripper, change it to another brand that fits snugly. A filter that doesn’t fit correctly into the dripper will not promote proper water drainage. Your draining time will significantly increase, giving you a very bitter brew.
I’ve only used paper filter for my Bonavita Immersion dripper. I haven’t tested it with metallic basket filters. I’ll add my experience when I get the chance to try it out. Before I get to do that, if anyone has any experience, kindly comment below how it is, and I’ll add it here.
As for cloth type filters, as long as they fit snugly into the dripper, they should be fine to use. However, these cloth filters tend to be larger, so it won’t be enough for making two regular cups of coffee (12 oz or 360 ml of water volume). Its maximum capacity will be enough to make a mug of coffee (10 oz or 300 ml water volume).
Set Your Timer
It’s better to set your timer at this point. If you brew with the Bonavita Immersion Dripper every day, then your timer will most likely always stay the same. Set your timer for 5 minutes, or use the same time that you brew your coffee using a French press.
Step 2: After Water has Boiled, Preheat the Dripper
Before you preheat your dripper. I’d like to remind you to make sure that the dripper valve is closed.
Once you’re sure that the valve is closed, and your water has finished boiling, pour the freshly boiled water intp the dripper by pouring over the upper part of the dripper. Allow the water to flow downward into the dripper and be sure to wet all the paper filter to remove any possible paper taste. Fill up the dripper until about one third (1/3) or one half (1/2) of the dripper height.
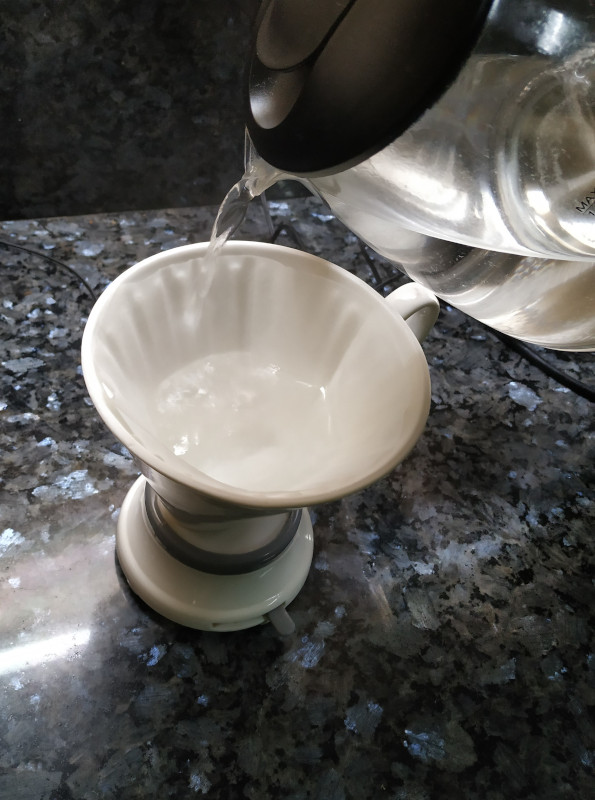
Cover the dripper with the plastic lid to allow the whole dripper to heat up.
Step 3: Grind Your Coffee Beans while Waiting for Dripper to Heat Up
While you’re waiting for your dripper to heat up, start grinding your beans. Grinding it at this stage will allow you to extract the freshest taste possible.
Grind Size for Bonavita Immersion Dripper
This is a good time to talk about the grind size. For the Bonavita Immersion Dripper, use a coarse grind size, or the same grind size that you would use when using a French press.
Each manufacturer’s grinders would have different grind settings. But it’s safe to assume that grinding for coarse grind sizes would be around three fourths of the grinder.
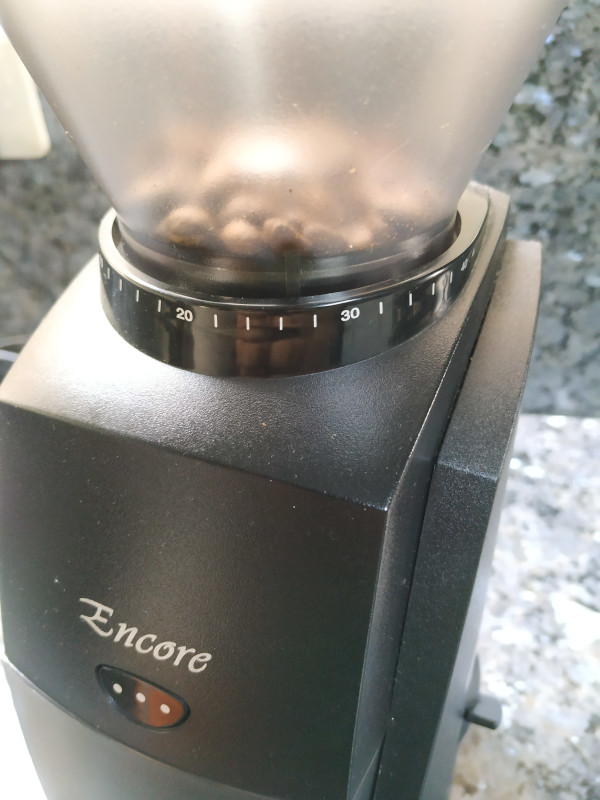
For reference, I’ve used a Baratza Encore since I’ve started grinding coffee beans. The recommended setting for coarse grind with the Baratza Encore is 30 out of 40. But in this case, I’m going for a 25 our of 40 grind setting.
For more information, you can look at my article about Understanding Grind Sizes.
Step 4: Discard Water in Dripper
We’re just about ready to brew our coffee. Remember to discard the water that’s keeping your dripper warm by simply throwing it away from the top of the brewer. Don’t bother opening the valve, or you might forget to close it again, and your brew will be ruined.
Step 5: Place Ground Coffee in Dripper
This is it. We’re starting our brew. After you put the ground coffee into the dripper, make sure that the valve is once again closed (in case you opened the valve when you discarded the preheating water).
Take note that Step 2 to Step 5 should only take you about 30 seconds to 1 minute. You shouldn’t go for too long as your boiled water will start to cool down and not give you optimal brewing temperature.
If you use a thermometer, you can check the water temperature to make sure that it’s between 195 to 205 degrees Fahrenheit (91-96 degrees Celsius). But as long as your water is inside the kettle, 30 seconds to 1 minute of prep time should keep you at the range for optimal brewing temperature, as long as you’re in a relatively temperate climate.
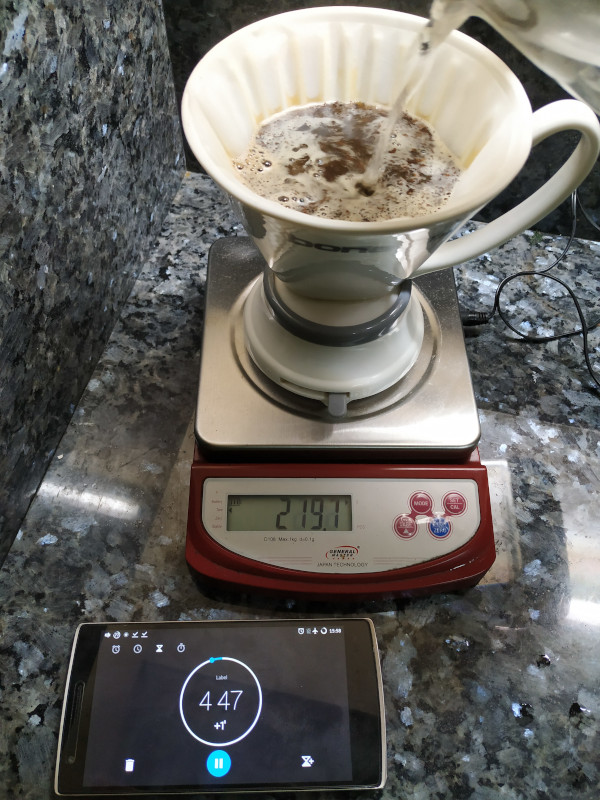
Step 6: Start Your Timer and Place 10% of Boiled Water into Dripper (30 Seconds)
Start your timer and pour 10% of your target water volume into the brewer. Let’s say you want to brew one regular mug of coffee at 300 ml or 10 oz, put in 30 ml of water and leave it for 30 seconds. This will allow any excess gases inside the ground coffee to escape, and allow the best extraction from the beans when you start to steep the coffee beans.
I highly recommend using a weighing scale because you can be very accurate in measuring your water volumes with one. If you don’t use one, you’ll have to eyeball the water volume.
Step 7: After 30 Seconds, Add the Remaining Water into the Dripper
After the 30 second mark, add in the remaining amount of boiled water. In the example given above, pour in the remaining 270 ml of water into the brew.
You can have a little addition in water volume when you add in the water. Some of the water will stay with the beans during the draining process, and some of the water will seep into the paper filter, so adding 10 ml of water per 150 ml of water is allowable.
And if you just eyeball the water volume with the Bonavita Immersion Dripper, I’d recommend making a mug of coffee instead. Making a mug is easy with the dripper because the water amount will almost reach the top, and you won’t have any issues with calculating water volume that way.
Step 8: Stir, Cover and Wait
Stir the brew for a bit after you add in the required amount of water to allow all the ground coffee to be immersed in water and extract all the flavors evenly.
Don’t forget to cover the brew with the lid. Covering will trap the heat inside and keep the temperature within the optimal temperature range. This will allow the water to extract as much out of the coffee grounds within the time that you steep the coffee.
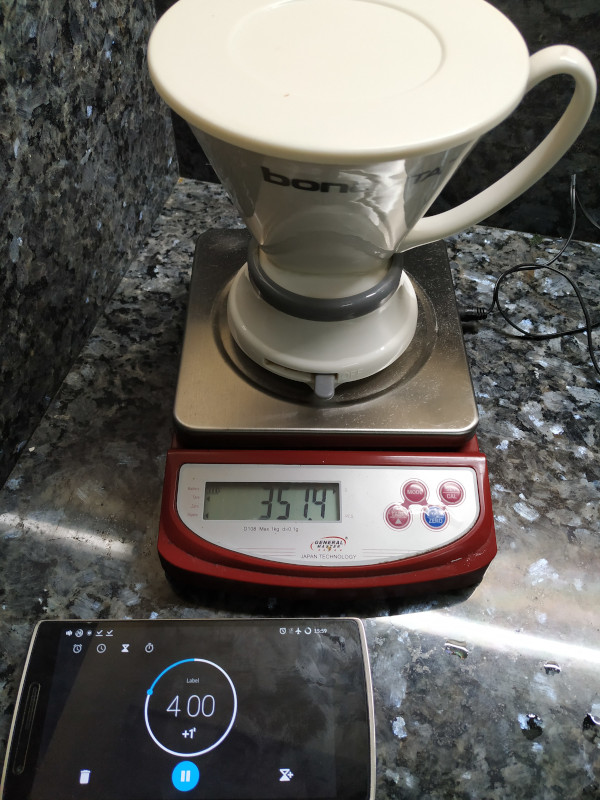
At this point, your job is done, just allow the brew to finish and give that job to the timer.
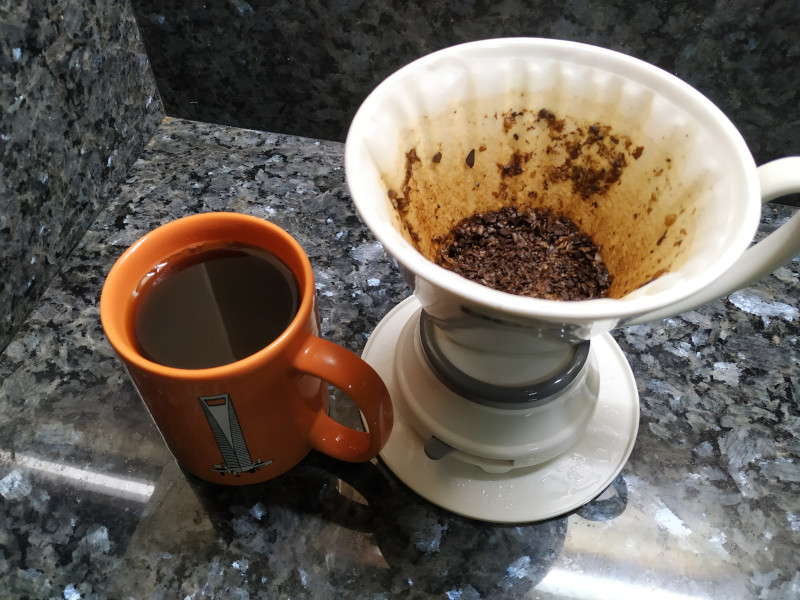
Step 9: Place on Vessel and Release the Coffee!
Now that you’ve finished brewing, simply place the dripper on top of your cup, mug, or carafe.
Release the valve and take off the lid. If you keep the lid on, your coffee will drain slower. It could also stop draining altogether.
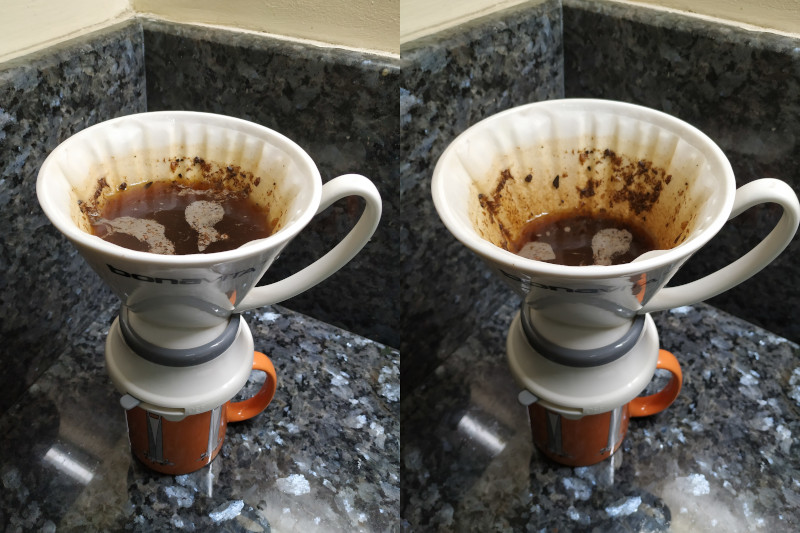
Your coffee should drain down the brewer pretty fast. And the amount of draining should take no more than 30 seconds
Step 10: Enjoy!
Congratulations! Your coffee is now done and you’re ready to take in all that flavor. The Bonavita makes pretty good coffee. Personally, I find that it extracts more flavors than the French press.
Total Brew Time
Since I brew medium roasted coffee, I made my brew time a little longer. The steps below lay down my total brew time like this:
|
Brew Time (in Minutes) |
Action Steps |
|
0:00 – 0:30 |
Pour in 10% (Blooming the Coffee) |
|
0:31 – 1:00 or less |
Pour in 90% of water, stir, close lid |
|
1:01 – 5:00 |
Steep coffee and wait |
|
5:00 – 5:30 |
Open valve and Drain Coffee |
If I brew dark roasted coffee, I could probably lessen the brew time by 30 seconds as dark roasted coffee will be pretty bitter if left for too long.
And there you have it. Your coffee is now ready, and you can brew cup after cup of great coffee everyday with the Bonavita Immersion Dripper.
This dripper is very easy to use. It requires no experience and makes great coffee.
If you’d like have a more in-depth review on the Bonavita Immersion Dripper, check out my article here.
By now I hope you’ve already made, and are already enjoying, your awesome coffee. I made a mug of coffee while writing this article and I am still feeling the nice and balanced coffee taste until now.
I hope this guide has helped you as a good guide in using the Bonavita Immersion Dripper. If you’d like any more guides, feel free to leave a comment below. I usually get my hands on a coffee maker first. Use it until I get really good at it, and then write a guide or a review on it.
Thanks for taking the time to read. See you on the next article!